 When adding a popup window configuration there are 4 simple steps to follow which are outlined below.
Step 1 :: Define Popup Window Parameters
There are 3 elements to defining the popup window parameters.
- DIMENSIONS
- POSITION
- OPTIONS
DIMENSIONS
You can specify a height and width of the popup window in the SIZE fields or you can specify FULLSCREEN. Fullscreen will open the window to the full width and height of the visible area of the users screen. Not to be confused with FULL SCREEN MODE that can be used in Internet Explorer.
POSITION
You can specify the location of the popup window upper left-hand corner. Obviously this is moot if you selected fullscreen. You can type the left and right coordinates in the SPECIFY fields or you can choose CENTER or RANDOM.
OPTIONS
The options area allows you to specify the various options that the popup window or windows will utilize when they are opened. By default, none of the options are selected. You can choose from all the following options:
- Location Bar
- Directories
- Menu Bar (recommended if you want to allow for printing)
- Tool Bar
- Status Bar
- Resizable (recommended)
- Scrollbar (recommended)
When you are done making all your Step 1 selections, move onto Step 2 by clicking the radio button next to Step 2.
| Step 2 :: ADD a Popup Window Configuration |
 When adding a popup window configuration there are 4 simple steps to follow. I will outline each of them below.
Step 2 :: Define Popup Window Configuration
There are 2 elements to defining the popup window configuration. You must select one of them to proceed with Step 2:
- OPEN SINGLE POPUP WINDOW
- OPEN SERIES of POPUP WINDOWS
OPEN SINGLE POPUP WINDOW
You chose to open up ONE SINGLE popup window. You can type the full URL of the address you would like opened up in the popup window or you can use the POPULATE button to select a file on the server. See POPULATE heading below for more details on how to use the POPULATE mechanism.
Go to SELECT TRIGGER MECHANISM to finish Step 2.
OPEN POPUP WINDOWS IN SERIES
You chose to open up a series of popup windows. The first option you need to define is how you want the windows to open. Do you want them to open all at one time or do you want them to open in series (daisy chain, one after another). Choose your preference by selecting the appropriate radio button.
Next define/select the popup windows. This is not much different than selecting just one window but there are a few more options to define.
You will use the POPULATE mechanism to select the windows to open in the series. See POPULATE below for details.
To the right of the windows listing are the REORDER options. The windows will be opened in the order they appear in the list. This is assuming you chose them to open in series. Using the MOVE UP, MOVE DOWN, and DELETE options you can change the order the windows will open. To perform an action on a window in the list you simply need to select the window in the list and click one of the action links (MOVE UP/MOVE DOWN/DELETE). The commands perform the actions as followed:
- MOVE UP: This will move the selected window up one row in the list.
- MOVE DOWN: This will move the selected window down one row in the list.
- DELETE: This removes the window from the list entirely.
Note: To re-add the window after DELETING it from the list you can repeate the POPULATE step as shown below.
Go to SELECT TRIGGER MECHANISM to finish Step 2.
POPULATE
 The POPULATE mechanism is a popup window that will allow you to navigate your server and select files in one or more directories. There is also a field in the POPULATE mechanism called the MANUAL URL that allows the user to specify remote server URL. These are typed in using a complete URL path. Type the complete URL in the MANUAL URL field. For example, http://www.yahoo.com would be used to open up Yahoo. You can also specify the path to a file that is on the server as well - but why do this when you can just navigate to the directory and select it? There is no mistaking that the correct URL will be used then.
You can enter subdirectories that exist on your server simply by clicking the directory name in the list. As you navigate through the server the path will be shown next to the CURRENT WORKING DIRECTORY indicator. Each directory in the path is a link back to that directory. Simply click that link to return to that directory. All the selected popups will be retained, regardless of the amount of popups selected and the amount of directories you navigated to.
Select the window or windows you wish to open then click the SUBMIT SELECTIONS button.
SELECT TRIGGER MECHANISM
There are 2 options in the SELECT TRIGGER MECHANISM configuration.
- WHEN PAGE LOADS (onLoad)
- WHEN PAGE UNLOADS (onUnload)
WHEN PAGE LOADS
This is triggered when the page is opened by the user. As soon as the page is opened the window/windows will open. You can also specify a delay, in seconds, before the popups will be triggered.
WHEN PAGE UNLOADS
This is triggered when the page is exited/closed by the user. When the window is closed or the page is exited by the user going to another URL the popups will be triggered.
Now that you have defined and/or selected the popup windows that will appear you see them listed in the textarea.
When you are done making all your Step 2 selections, move onto Step 3 by clicking the radio button next to Step 3.
| Step 3 :: Define Popup Frequency » Cookie Controller |
 Step 3 is the easiest Step to the whole process.
Step 3 :: Define Popup Frequency » Cookie Controller
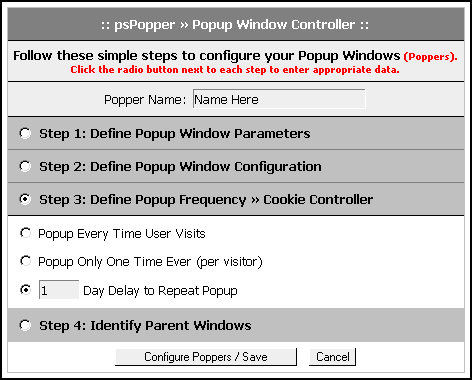
There are 3 options to defining the popup popup window frequency parameters.
- POPUP EVERY TIME USER VISITS
- POPUP ONLY ONE TIME EVER (per visitor)
- xx DAY DELAY TO REPEAT POPUP
POPUP EVERY TIME USER VISITS
Choose this option if you would like to popup the same window or window series every single time the user visits the parent window, the page that opens the popup. This will open every time a users visits, no matter how many times they visit each week, day, or hour. It can get very annoying to the user and may be counterproductive to select this option.
POPUP ONLY ONE TIME EVER (per visitor)
Use this option to limit the popup to appear only the very first time a user visits your site. The popup will never appear for the user again. Assuming they use the same computer and do not delete their cookies.
xx DAY DELAY TO REPEAT POPUP
This options allows you to set the number of days before the user will be presented with the popup window or window series again. Type the number of days you wish to set the cookie for. While the cookie is active on their computer the popup window will not appear again. Once the day timer expires the cookie the popup will appear once again. This will happen over and over as long as they keep returning. The day delay, like the POPUP ONLY ONCE, will work as long as they use the same computer and do not delete their cookies.
When you are done making all your Step 3 selections, move onto Step 4 by clicking the radio button next to Step 4.
| Step 4 :: Identify Parent Windows |
 Step 3 is the final Step to the whole process.
Step 4 :: Identify Parent Windows
This is where you identify what pages on your server will spawn the popup window. The PARENT window is the window that opens popup windows. You will use this Step to identify one or more parent windows that will be used to open the popup windows.
You can select as many parent windows as you wish. There is no limit. This is where the power of the script comes into play. After selecting these windows the script will open and edit each page one after another adding all the code required to open the popup window configuration you specified in steps 1-3 above. You do not need to do anything else to get this to work, just tell the script what pages you want edited!
There are 3 basic elements to the parent window identification step.
- POPULATE
- VIEW WINDOW
- REMOVE WINDOW
POPULATE
The POPULATE mechanism is a popup window that will allow you to navigate your server and select files in one or more directories.
VIEW WINDOW
Use this link to view the selected window to make sure it is the window you intended to select. Use the POPULATE mechanism to select the appropriate window if you have selected the wrong window by accident.
REMOVE WINDOW
This options allows you to eliminate a particular window as a parent window. This command will also go into that page and edit out any code that was previously inserted. Now that IS powerful!
When you are done selecting all your parent windows all you need to do now is click CONFIGURE POPPERS/SAVE and the script will handle the rest for you automatically. It will go edit each page and add the appropriate code and your popup configurations are complete! ENJOY!


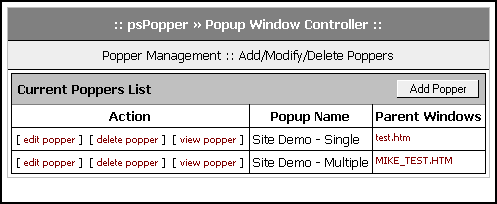
 When you first login to psPopper you are taken to the MANAGE page (see screenshot to the right).
 When adding a popup window configuration there are 4 simple steps to follow which are outlined below.
 When adding a popup window configuration there are 4 simple steps to follow. I will outline each of them below.
 The POPULATE mechanism is a popup window that will allow you to navigate your server and select files in one or more directories. There is also a field in the POPULATE mechanism called the MANUAL URL that allows the user to specify remote server URL. These are typed in using a complete URL path. Type the complete URL in the MANUAL URL field. For example,
  Step 3 is the easiest Step to the whole process.
 Step 3 is the final Step to the whole process.