| How to use psGuest |
 | |
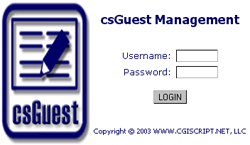
Using the username and password you created upon installation, LOGIN to psGuest to enter the script management.
To reset the username and password refer to the script README file for instructions. Follow the same instructions used to change the username and password to look up the username and password if you happen to forget what they are.
 When you first login to psGuest you are taken to the MANAGE page (see screenshot to the right).
There are many options to choose from:
- GUESTBOOK MANAGEMENT
- ADD NEW
- EDIT SELECTED
- DELETE SELECTED
- PREVIEW
- Guestbook specific commands:
- LINKS WIZARD
- DOWNLOAD EMAIL ADDRESSES
- CHANGE PASSWORD
- SUBMISSION MANAGEMENT
GUESTBOOK MANAGEMENT
There is a dropdown list that contains all the current Guestbooks. Select the category you wish to edit/delete/preview and press the appropriate link. You can also ADD NEW, CHANGE PASSWORD, DOWNLOAD EMAIL ADDRESSES, or use the LINKS WIZARD by clicking the appropriate links.
GUESTBOOK MANAGEMENT
Under the LINKS WIZARD you see the area used to list the links in the selected category. There is one main button and there are 3 columns visible:
- ACTIONS
- HIDE/UNHIDE
Use this action to hide or unhide the submission from public view. The submission will remain in the admin area but will not be viewable on the public side.
- MODIFY
Use this to edit the guestbook parameters.
- DELETE
Use this to delete a submission. The submission is PERMANENTLY deleted.
- AUTHOR
This shows the information typed in by the submitter.
- MESSAGE
This is the message typed by the submitter.
ADD NEW/EDIT GUESTBOOK CONFIGURATION
 The ADD/EDIT GUESTBOOK feature is the most powerful feature of psGuest. It allows you to configure all the various options that psGuest provides, such as:
- GUESTBOOK NAME
- ENTRY FIELDS
- Submitter NAME
- Submitter EMAIL address
Note: Each field can be specified as REQUIRED AND HIDDEN. If REQUIRED is checked the user MUST fill in the field to be able to submit the form. If HIDDEN is checked the results of the field will not be visible to the public.
- Custom Fields
- You can use up to 10 custom entry fields.
- Click the ACTIVE checkbox to make the field appear on the submission form.
- Type the NAME of the custom field in the Field Name textbox. Keep this name short.
- Select the field options.
Note: Each field can be specified as REQUIRED AND HIDDEN. If REQUIRED is checked the user MUST fill in the field to be able to submit the form. If HIDDEN is checked the results of the field will not be visible to the public.
CONFIGURATION
- DATE FORMAT
- Select from English or European date format:
- MM-DD-YYYY (English)
- DD-MM-YYYY (European)
- DATE DELIMITER
- Select the type of date delimiter you wish to use:
- HYPHEN: MM-DD-YYYY
- SLASH: MM/DD/YYYY
- DECIMAL: MM.DD.YYYY
- DELETE ENTRIES TIME LIMIT
- Specify the amount of days you wish to allow the entries to be visible before they are deleted. Leave blank to leave the submissions active forever.
- CHARACTER LIMIT
- Specify the maximum amount of characters you wish to allow the users to add to the MESSAGE box when the submit the entry. Specifying a limit is recommended in order to keep users from spamming your guestbook.
- DISABLE SMILIES
- Clicking this disables the ability of adding smilies to the message. The smilie images will not appear on the submission form.
- DISABLE ICONS:
- Clicking this disables the ability of adding message icons to the submission. The icons images will not appear on the submission form.
- ALLOW HTML
- This allows the users to type HTML in the message field. Use this with extreme caution!
- ENTRY ORDER
- You can specify the order the entries appear on the guestbook:
- Newest entries first.
- Newest entries last.
- ENTRIES PER PAGE
- Specify the number of entries you wish to display per page. The remaining entries will span multiple pages.
- APPROVE SUBMISSIONS
- Selecting this will place all submissions into HIDDEN status until the administrator UNHIDEs them. Specify the email address of the person you wish to notify of the submissions. A copy of the submission is mailed to them for reference.
- SUBMISSION NOTIFICATION
- Selecting this will send an email to whomever is specified in email address field. Specify the email address of the person you wish to notify of the submissions. A copy of the submission is mailed to them for reference.
- AUTO RESPONSE
- Selecting this will send an auto response to the submitter. You can type a message to the submitter that will appear in the email address. You can specify an email address that will be shown as FROM in the email that is sent. You may also specify the SUBJECT of the email address. You may also specify whether or not you want the original submission to be sent as well.
- GUESTBOOK TEMPLATE
- The default guestbook template is used unless another template is specified in the textarea provided. You can auto populate the textarea with the HTML code of the default template by clicking the LOAD TEMPLATE button. You can then edit the code directly or download and edit the template using your favorite HTML editor. Then copy the code back into the text area. This affects only the CURRENT guestbook.
- GUESTBOOK SIGNING TEMPLATE
- The default signing template is used unless another template is specified in the textarea provided. You can auto populate the textarea with the HTML code of the default template by clicking the LOAD TEMPLATE button. You can then edit the code directly or download and edit the template using your favorite HTML editor. Then copy the code back into the textarea. This affects only the CURRENT guestbook.
- BAD WORD FILTER
- List all the words you would like to FILTER out of your submissions. List each bad word on a new line in the textarea. The bad words are replaces with the phrase you type in the field provided. For example, you can replace all the bad words with {bleep}. Look at the demo for a sample list of bad words.
- RESTRICT IPs
- You may find that someone is being very offensive in your guestbook. Each person that submits an entry to the guestbook has the IP tracked in the admin area. If you decide to ban someone that is being very offensive you can get their IP address from the admin area and add it to the RESTRICT IPs list textarea. Add one IP address per line.
LINKS WIZARD
 This is used to capture the link code to show the links on your website (see screenshot to the right). Use the GRAB button to get the type of code you desire, use COPY to get the text into buffer. Then open your favorite web editor and paste the code into your HTML document in the location you wish the LINKS LIST to appear.
- Guestbook Dropdown
Use this to select the desired category you wish to use.
- JavaScript Code
Use the GRAB button to capture the JavaScript code.
- Server Side Include (SSI) Code
Use the GRAB button to capture the SSI code.
- PHP Code
Use the GRAB button to capture the PHP code.