When adding/modifying calendar you only need to add a calendar name, calendar description (optional), then add the calendar events.
 ADD/MODIFY A CALENDAR
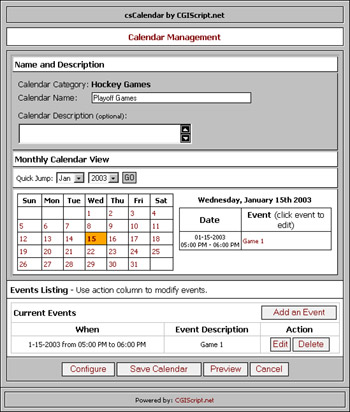
There are a few elements to defining a calendar (see image to the right).
- CALENDAR NAME/DESCRIPTION
- MONTHLY CALENDAR VIEW
- EVENTS LISTING
CALENDAR NAME/DESCRIPTION
The Calendar Name is used to title the calendar. Use names that are short and to the point. Such as Monthly Meetings, Board Meetings, Playoff Games, etc. The title appears in bold text above the calendar when being viewed.
The Calendar Description is used to further explain the reason and purpose behind the calendar. This is an optional field. Not all calendars need to be described, normally the Calendar Name is more than enough. This text will be displayed under the Calendar name and above the calendar being viewed.
MONTHLY CALENDAR VIEW
The Monthly Calendar View can be used to view the events shown in each month displayed. Change the month/year by using the QUICK JUMP date drop-down menus. Dates that contain events will be highlighted. Click on the highlighted days to view the events for that day. Click on the events in the EVENT column to view the details of that event.
EVENTS LISTING
The Events Listing is used to manage existing events. All the events of the calendar are listed in the Events Listing table. You can see that there are 3 columns: When describes the date/time of the events. Event Description lists the description that was typed in during the add process. The Action column contains buttons used to Edit or Delete each event.
ADD an EVENT
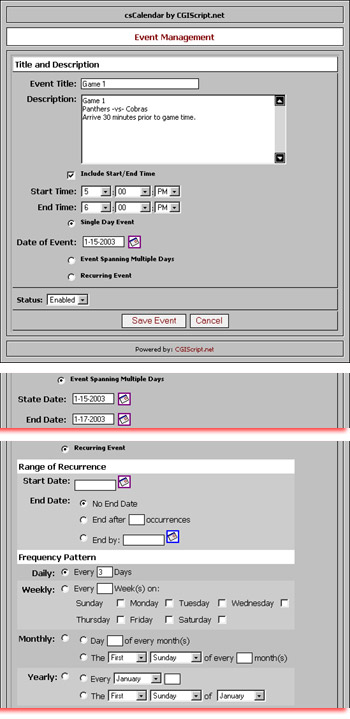 Adding an event is the most powerful feature of csCalendar. Listed are all the options and what these options are for (see image to the right).
EVENT TITLE
This will be used to identify the event. Keep this short and simple.
DESCRIPTION
This is where you list the actual event details. You can type as much text as you would like.
INCLUDE START/END TIME
Use this option to specify the start and end time of the event. Otherwise it is assumed it is a reminder-type event.
The start and end times are entered using dropdown menus. Select the start/end Hour, Minute, and AM/PM.
FREQUENCY
This is where you select from Single Day Event, Event Spanning Multiple Days, and Recurring Event.
SINGLE DAY EVENT
Use this if the event is for one day only.
EVENT SPANNING MULTIPLE DAYS
use this if the event spans more than one day. There is no limit on the amount of time/days an event can span.
RECURRING EVENT
This is the most comprehensive setting within csCalendar! When adding a recurring event follow these steps:
RANGE OF RECURRENCE
Specify when the events starts and stops.
- Start Date
Specify the date the event will start.
- End Date
Choose from:
- No End Date
The recurring event has no ending date.
- End After XX Occurrences
Specify how many times the event will occur.
- End By Date
Specify the date the event will end.
FREQUENCY PATTERN
Specify the frequency of the event. Choose from one of these options.
- DAILY
Specify how many days the event will occur. For example, every 3 days.
- WEEKLY
Specify how many weeks between each event. Then specify which days of the week the event will recur on. For example, every 3 weeks on Monday, Wednesday, and Friday only.
- MONTHLY
Specify on what day of the month the event occurs or specify one of each the following options to identify the event frequency. For example, Day 2 of Every Month or The First Wednesday of Every 3 Months.
- First, Second, Third, Fourth, or Fifth.
- Monday, Tuesday, Wednesday, Thursday, Friday, Saturday, or Sunday.
- Then specify the month interval.
- YEARLY
You can specify the month and day of the event or specify one of each the following options to identify the event frequency.
- First, Second, Third, Fourth, or Fifth.
- Monday, Tuesday, Wednesday, Thursday, Friday, Saturday, or Sunday.
- Then select the month.
Navigation Buttons
The Navigation Buttons at the bottom are used to Configure, Save Calendar, Preview, and Cancel.
 Each calendar can be configured separately. By clicking CONFIGURE in the calendar management page you will be taken to the Configuration window (see image to the right).
CONFIGURE CALENDAR
There are 3 basic elements to configuring a calendar:
- DATE FORMAT
- CALENDAR OPTIONS
- CUSTOM FIELD MANAGEMENT
DATE FORMAT
The Date Format consist of 2 options"
- LAYOUT - Select from Month/Day/Year or Day/Month/Year format.
- SEPARATOR - Select from Slash, Hyphen, or Period.
CALENDAR OPTIONS
Select from all these various options below:
- Allow Public Calendar Additions
Selecting this option will show a button on the public facing calendar that will allow them to add events to the calendar.
- Require Approval of Public Additions
Select this option to force the public additions to be approved before they are viewable in the calendar.
- Email Notification of Submissions
Select this option to receive an email each time a public submission is made.
- Approval Email
This will contain the email of the person that will receive notification of the public submissions.
- Allow Visitor Comments on Events
Selecting this option will show a form to the public that they can use to add their name and comment to the event listing.
- Comments on Results Page
This is used to limit the number of comments are visible on the calendar main view. Remaining comments can be viewed using the "More" link on the calendar view.
- Calendar Starts On
This options sets the first day of the week.
- Event Display
You can choose from:
- Show in Popup (specify the popup dimensions as well)
- No Popup (events will be displayed on the same page as the calendar)
CUSTOM FIELD MANAGEMENT
You can create up to ten additional fields that will be used to enter events into calendars. All you need to do is enter the Field Title and click the "*" checkbox if you want to make the custom field required. If Required "*" is selected the person inputting events will have to fill out the field in order to submit the form. Note, try to keep the field names short and to the point. Such as: Required Members, Location, Supplies Needed, etc.
LINKS WIZARD
 Using the LINKS WIZARD (example to the right) allows you to easily get the code required to add the calendar to any pre-existing web page. Follow these simple instructions:
- Select CATEGORY
Choose the category that contains the calendar you wish to utilize.
- Select CALENDAR
The Calendar list will populate automatically when the category is selected. Choose the calendar you wish to utilize. The code will auto-populate the textareas next to each button.
- Then select the type of calendar you wish to select by clicking the appropriate button. If you are using Links Wizard from csPublisher, simply click the button of choice. The rest is automatic. If you are not using csPublisher, grab the appropriate code from the textarea next to the button of choice. Then copy/paste that code into the HTML document of choice.
- INSERT SMALL CALENDAR
- INSERT LARGE CALENDAR
- INSERT POPUP CALENDAR


 When you first login to csCalendar you are taken to the MANAGE page (see screenshot to the right).