| How to use psLinks |
 | |

The first thing you will need to do is LOGIN to psLinks (see screenshot to the right).
When you installed the script you selected a username and password. Type that username and password into the appropriate fields and click LOGIN to psLinks to enter the script management.
To reset the username and password refer to the script README file for instructions. Follow the same instructions used to change the username and password to look up the username and password if you happen to forget what they are.
 When you first login to psLinks you are taken to the MANAGE page (see screenshot to the right).
There are many options to choose from:
- CATEGORY MANAGEMENT
- ADD NEW
- EDIT SELECTED
- DELETE SELECTED
- PREVIEW
- CHANGE PASSWORD
- LINKS WIZARD
- LINKS MANAGEMENT
- ADD LINK TO SELECTED CATEGORY
- EDIT LINK
- DELETE LINK
- DISABLE/ENABLE LINK
CATEGORY MANAGEMENT
There is a dropdown list that contains all the current categories. Select the category you wish to edit/delete/preview and press the appropriate link. You can also ADD NEW or CHANGE PASSWORD by clicking those links.
LINKS MANAGEMENT
 Under the LINKS WIZARD you see the area used to list the links in the selected category. There is one main button and there are 3 columns visible:
- ADD LINK TO SELECTED CATEGORY
This will open the ADD form that was created in the CONFIGURATION screen during category creation (see screenshot to the right).
- ACTIONS
- EDIT LINK
Use this action to open the add/edit form and add/change values as desired.
- DELETE LINK
Use this to delete the link shown in that row. Once deleted the link is gone forever.
- DISABLE/ENABLE LINK
Using this enabled or disables the link. this simply means that if ENABLE is selected the link WILL appear on the links page. If DISABLE is selected the link will not be shown. When the configuration indicates that approval of the submission is required, the link is added with DISABLED status. To enable it, simple click the ENABLE link.
- LINK
This shows the link BANNER/IMAGE (if applicable) or link domain and the link description.
- CLICKS
This will show the amount of times the link has been clicked.
ADD NEW/EDIT CATEGORY CONFIGURATION
 The ADD/EDIT CONFIGURATION feature is the most powerful feature of psLinks. It allows you to configure all the various options that psLinks provides, such as:
- NAME
- PAGINATION
- Use Pagination (split links amongst multiple pages)
- Number of links to display per page.
- TYPE
- Allow Public Submissions
- Require approval of public submissions
- Send email notification of public submissions
- Email field
- ORDER
- Rank by number of clicks (most to least)
- Order alphabetically (ascending domain names)
- Order by date entered (newest first)
- Order by date entered (oldest first)
- LINK TARGET
- ALLOW BANNER UPLOAD
- Allow banner/image to be used for link
- Valid extensions field
- Maximum file size field
- Show image border option
- SHOW NUMBER OF CLICKS
- Option to show number of clicks near each link
- ALLOW HTML CODE IN FIELDS
- This option will allow users to add HTML code to the fields being used. Use this option with caution - the public could upload malicious code.
- CUSTOM FIELDS
- Add up to 10 custom fields
NAME
This field is used to NAME the category. Use a brief but descriptive name so you remember what the purpose was later.
PAGINATION
Pagination allows the links to span multiple pages when they get to be larger in numbers. For example, if you had 100 links and specified 10 links per page, the page links at the bottom would show 10 additional link pages.
- To use this, simply CHECK the box next to the USE PAGINATION text. Then specify the number of links you wish to show per page.
- Benefits of using pagination:
- Avoid very long pages of links
- Force users to view more pages/ads by making them view multiple pages to see all your links
TYPE
The category TYPE is an option that enables you to allow the public to submit links to your list.
- Allow Public Submissions
Choose this to allow the public to see a SUBMIT LINK BUTTON to access the add form
- Require approval of public submissions
Select this to force approvals on all submissions before they are visible to the public
- Send email notification of public submissions
Select this if you would like the administrator to receive an email when submissions are made. The email will show the submission and a link to the management system.
- Email field
Add the administrators email here, separate emails using a comma to sent to multiple admins.
ORDER
You can specify the order the links appear on the results page(s).
- Rank by number of clicks (most to least)
The link with the most clicks appears first, followed by the next highest number, and so on.
- Order alphabetically (ascending domain names)
The link with the lowest letter of the alphabet will appear first (i.e. aaa.com)
- Order by date entered (newest first)
The link that was added last will appear first in the list.
- Order by date entered (oldest first)
The link that was added first will appear first in the list.
LINK TARGET
Many sites uses frames, this allows you to type in the specific frame target you wish to have the link open up in.
- Simply type the frame name in the field.
- _blank is default (new window)
ALLOW BANNER UPLOAD
Adding a banner or image to the link makes the script very versatile. Now you can add banners and text descriptions to your links lists. Or use other images to help 'sell' the link. You could even upload photos of staff members and create an organizational chart out of your list of links.
- Allow banner/image to be used for link
Select this to add an upload field to the ADD LINK form.
- Valid extensions field
Type the extensions you wish to allow as images seperateby a comma (.jgp,.gif are default).
- Maximum file size field
You can specify a maximum file size for each image.
- Show image border option
Images that are used for links, by default, have an image border of 1 pixel. You can turn this option on and off at will.
SHOW NUMBER OF CLICKS
Every time a link is clicked the statistic is tracked by psLinks. You can view this number in the management area at any time. You can also show the number of clicks next to each link if you so desire.
- Option to show number of clicks near each link. They are always tracked, even if you decide not to show them on the links page.
ALLOW HTML CODE IN FIELDS
You can use this option to allow the submitters to add HTML code to the input fields. use this option with caution if you are allowing public submissions. There is no way to determine SAFE HTML from UNSAFE HTML code.
- This option will allow users to add HTML code to the fields being used. Use this option with caution the public could upload malicious code.
CUSTOM FIELDS
This is the best feature of psLinks. This allows the admin to add up to 10 additional custom fields to the submission form. It even has the option of making the custom fields hidden or visible to the links page.
- Simply type the name of the custom fields you wish to add (i.e. Email Address)
- If you wish to make the custom field hidden to the links page simply add an asterisks "*" before the name (i.e. *Email Address)
- The hidden fields are saved in the database and sent with submission notifications, but they are not shown on the links pages.
- The HIDDEN option is a great way to capture additional information from the submitter that will not be shown to the public (good for contact information, email address, phone numbers, etc).
PREVIEW
Clicking this opens the selected category in a PREVIEW popup window.
LINKS WIZARD
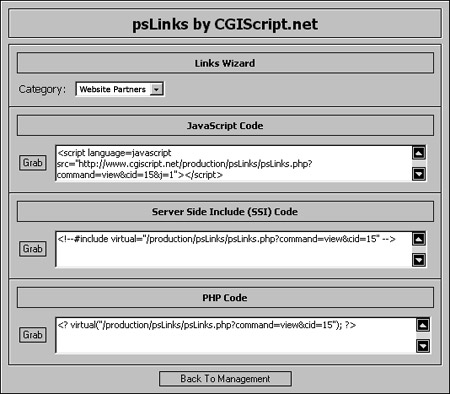 This is used to capture the link code to show the links on your website (see screenshot to the right). Use the GRAB button to get the type of code you desire, use COPY to get the text into buffer. Then open your favorite web editor and paste the code into your HTML document in the location you wish the LINKS LIST to appear.
- Category Dropdown
Use this to select the desired category you wish to use.
- JavaScript Code
Use the GRAB button to capture the JavaScript code.
- Server Side Include (SSI) Code
Use the GRAB button to capture the SSI code.
- PHP Code
Use the GRAB button to capture the PHP code.