Getting Started
csBlog Use Instructions
Login Process
Log into csBlog management at
http://www.yourdomain.com/csBlog/csBlog.cgi?command=login

Manage Blogs
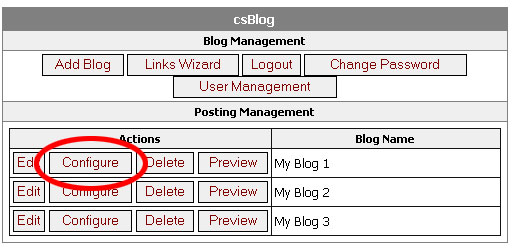
Once logged in you will come to the management screen.

Adding a Blog
Click the 'Add Blog' button and you are taken to
the Add/Edit Blog Configuration Settings window.
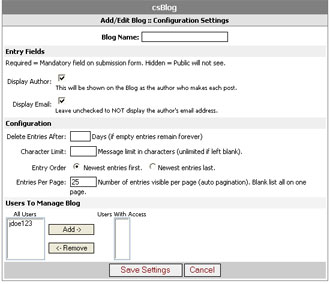
- Enter a name to identify your blog.
- Check whether or not you want the author name and/or email address required when
posting to the blog.
- Other optional settings are:
- Delete entries after XX days of being posted.
- Limit the number of characters allowed in any given post.
- The order of the entries (newest first/newest last).
- The number of entries to display per page.
- Note: If more entries have been posted than
the number listed in the entries per page option, then pagination links will be
available at the bottom of the blog to navigate through the different pages.
-
You can also specify users that are able to post to the blog. The users can be
configured on the main management screen by clicking the user management button.
You can add users to this blog at any time by clicking configure button for the
blog.
Click 'Save Settings' and you will be redirected back to the main management screen.
Using the Links Wizard
Once your blog has been created, click the 'Links Wizard' button at the top of
the main management page.

With the desired blog selected in the top dropdown.
Use the Grab button to select all the text in the textarea, then use the copy
option to add the code to your clipboard. You can select from one or the 4
specific code types:
- JavaScript Code
- Server Side Include Code (SSI)
- PHP Code
- Direct Link
Applying the Links Wizard Code
Now all you need to do is open the webpage where
you would like the blog to appear and paste the command into the HTML
code. For
example, if you create a page called myblog.htm, you would post the JavaScript display
code anywhere on the page where you would like the blog to appear. To use the server
side include display code, your hosting service might require you to have the
page named with the extension shtml (i.e. myblog.shtml). For the PHP display code,
the page would have to be named accordingly i.e. myblog.php).
Here is an HTML page before the Links Wizard code
has been added:

Here is what the page looks like after the
Links Wizard code h as been added and the page viewed:

Adding Blog Entries
Now you are ready to start adding entries to your blog. From the main
management screen, click on the 'Edit' button adjacent to the blog that you
would like to add an entry to. This will give you a preview of the current blog. At the top of the
screen, click the 'Add Entry Button'.
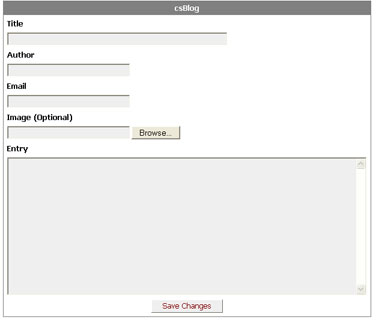
Enter the title for your posting. Your name, email address (optional as
specified in the configuration of the blog settings), an optional image or icon that will
appear next to your name (for example, a small portrait of your face or an small
image that adds detail to the blog entry), and the blog text entry itself.
In the entry textbox, you are
allowed to enter rudimentary HTML code (bold, italics, font face, etc.), link
code, and image calls. However
you are not able to add any JavaScript or META tags. Click the 'Save Changes'
button to save your entry. You now see the blog entry as the public will see it,
with the exception of having some management commands visible.
Hide/Modify/Delete Blogs
You can modify, hide, or delete any entry by clicking the appropriate links
underneath the posting. Hide will keep the entry from being visible in the blog,
Modify will allow you to edit the entry, and Delete will delete the entry
(permanently).

Once you are done adding entries to this
particular blog click the 'Back to management' button to return to the main
management screen. Once back at the main management screen you can Edit,
Configure, Delete, or Preview the blogs already created.
User Management
You can Add, Modify, and Delete users from the
user management screen. Different users can have varying levels of control, they
can be given the ability to add entries to one or more blogs.
Creating/Modifying a User
Click the ' Add User' button to add a new user.
Click 'Modify' to re-enter the add screen to change options.

After clicking the 'Add User' button this
screen appears:
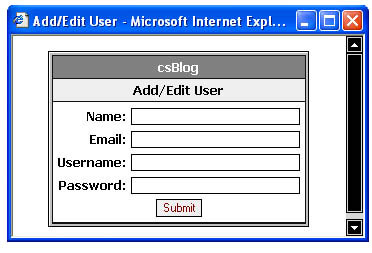
Enter the user's name (Full name, nickname,
etc.), email address, and username and password. Click 'Submit' and you will be redirected back to the main user management screen. Click
'Back to Management' to go back to the csBlog main management window.
Assign Users
Assuming you already entered users in to the
system, click the 'Configure' button adjacent the blog in which you would like
to manage users.
On the left hand side you see a list of All
Users. On the right hand side you see a list of Users With Access.
- To add access for a user, select the username
on the left side and click the 'Add ->' button.
- To remove a users access, select the username
on the right side and click the 'Remove ->' button.
You will see that the names will switch from one
list to the other. That is all that is required to grant or deny blog editing
permissions.

Click the 'Save Settings' button to return to
the management page. Now the user you granted permission to can access the
application using the same login screen the administrator does. However, they
will only see blogs they have been granted permission to manage.